From Cake Lab

Saturday, October 16, 2010

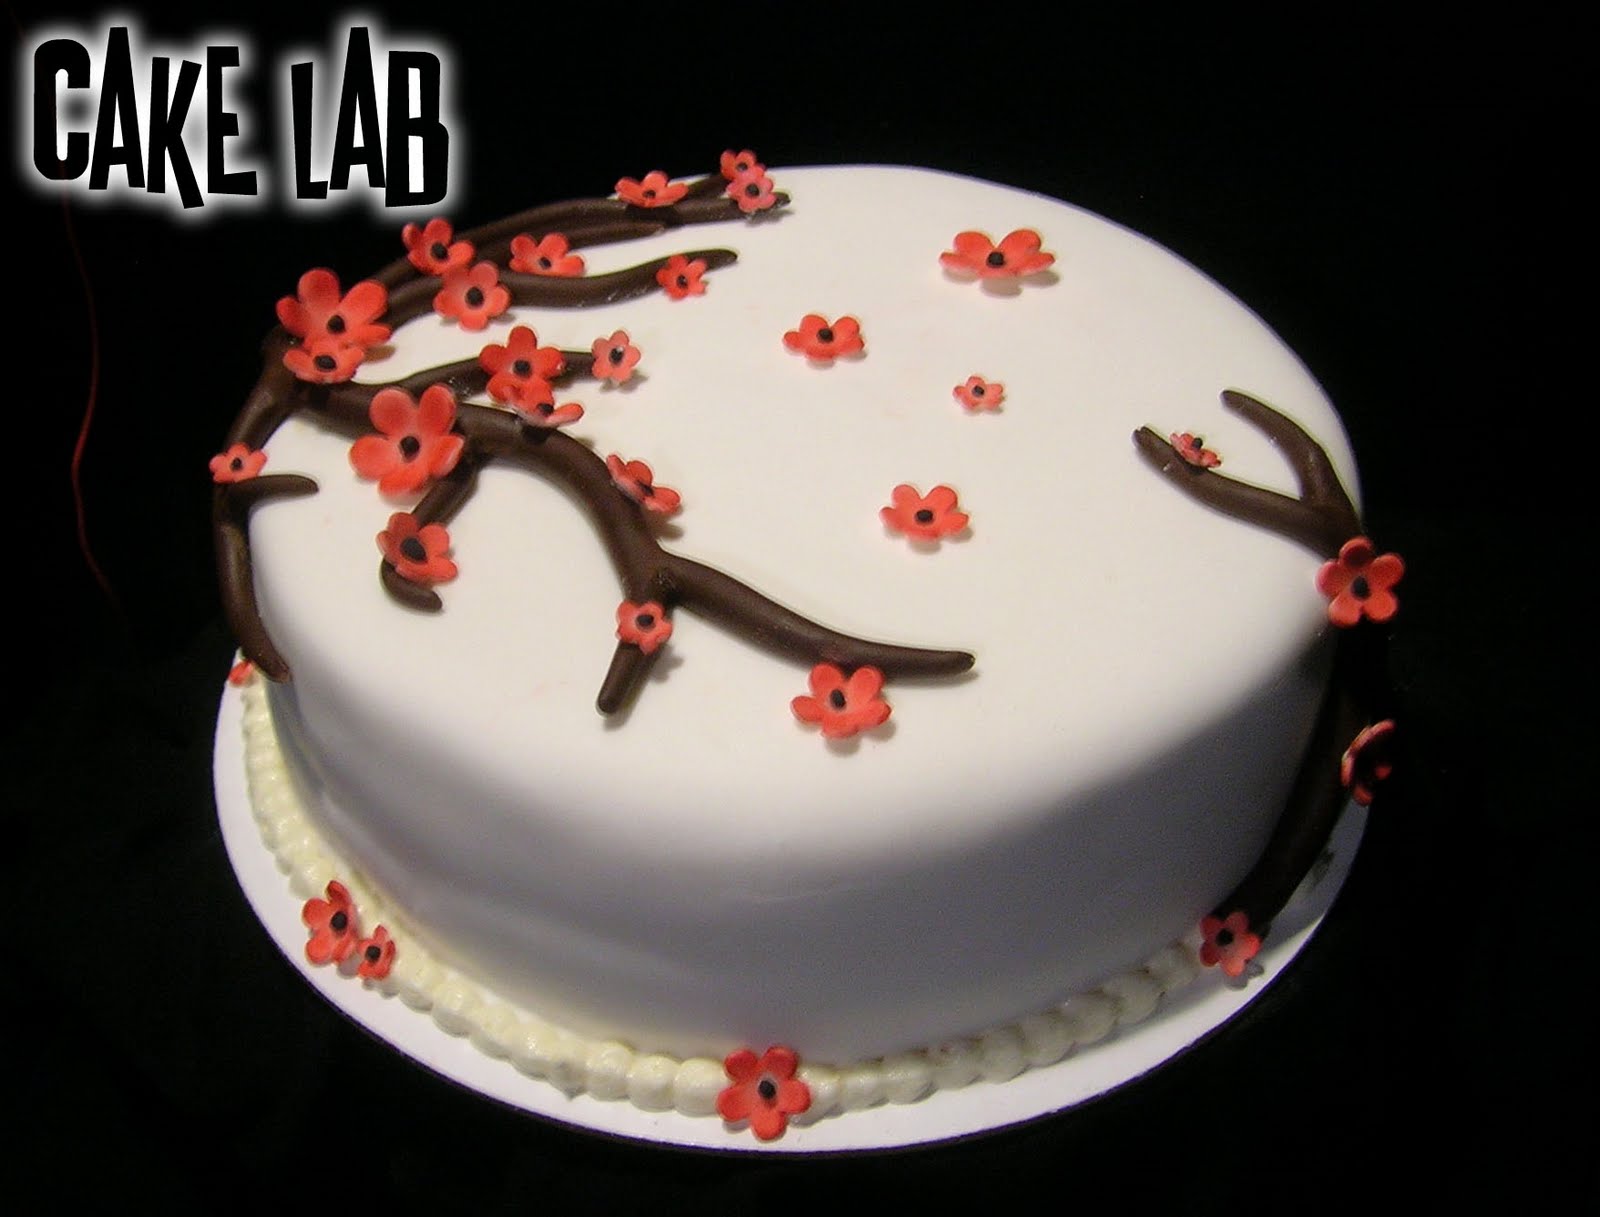
Red & Pink Cherry Blossom Cakes


A few days after my website went live I got a call about a wedding cake. It was pretty exciting to get a call so soon, without doing any real advertising, as my focus was on creating more samples. They asked if I could do a cherry blossom wedding cake, something that is pretty common and not too difficult. My portfolio doesn't include any wedding type cakes, so I thought now would be the perfect time to add some diversity to my collection.

Since I don't need a ton of cake lying around I decided to do a one tier version. I first chose to do red blossoms, but noticed after I dusted them that the color really should be coming from the center of the flower. Oops. I also wasn't sure what to put in the empty space. I was thinking some type of text like "Happy Anniversary", but that seemed pretty long.
After looking at the red blossom cake for a bit I wasn't that happy with it. Then I realized that the branches made of modeling chocolate and gumpaste flowers could easily be removed without leaving too much behind, so why not recycle the cake? That led to the pink cake, which I'm more satisfied with. I decided it would be safe to use a Chinese character since cherry blossoms are Asian, so I chose the symbol for marriage.

Friday, October 15, 2010

'Sex & the City' Themed B-Day Cake

Finally, another two tiered cake! It's really pretty wasteful to make two tiered sample cakes, so when I have the chance to make one for an event I really enjoy it.
My favorite part of this cake is definitely the skyline, although my hand was in pain from squeezing on all those little windows. The color combo of pink and black is pretty cool too...I always love black with a bright color. I was asked to make the pink fondant "not baby pink but not hot pink", and I think I got the right mix.
New tool for the letters! My new clickstix make it much easier to punch out font. I also have script letters on the way!
The cake also was lightly brushed with a pearl sheen but it's not really noticeable in the picture.
Been a very busy week making cakes and also finished another one today but I'll save the post for tomorrow. Time to clean the kitchen!

Wednesday, October 13, 2010

Tigger Cake


It's safe to say that most of my recent cakes have been on the darker side, but I really want to show some diversity in my designs so I have three girly cakes coming up this week (then maybe I will follow up with another scary one :) ).
After using modeling chocolate for the first time with The Beast cake, my mind was swarming with new ideas as the medium is so different from fondant and gumpaste and allows many more options. I thought Tigger would be a fun character to try as he is popular and is the "coolest" Winne the Pooh character in my opinion hahaha. He is made up of rice krispie treats covered in modeling choclate. The only thing unedible is the wire for the whiskers.
In my recent glee cake I had attempted to make a hand look like it was popping out of the cake. I was not at all pleased with the results so thought I would take this opportunity to get it right. I first placed a circle of black fondant on the cake where I wanted Tigger to pop out (thanks to some members from CakeCentral for the suggestion!), and then covered the whole cake in yellow. I began to cut the strips and things seemed to be going perfectly, not to mention it was one of my cleanest covering jobs, but as I lifted the flaps the black fondant stuck to the yellow and began ruining the buttercream. I think this happened because I used homemade black fondant which is a little stickier than usual. Fortunately I was able to salvage it and achieved the effect I was looking for.


This was my first time piping beads around the bottom of a cake. I have made fondant balls before, which is more time consuming, but also easier to avoid mistakes. It takes some practice but it's a skill I need to master so this cake got the treatment.
While it's not totally a "me" cake it was a lot of fun and very good practice.

Monday, October 11, 2010

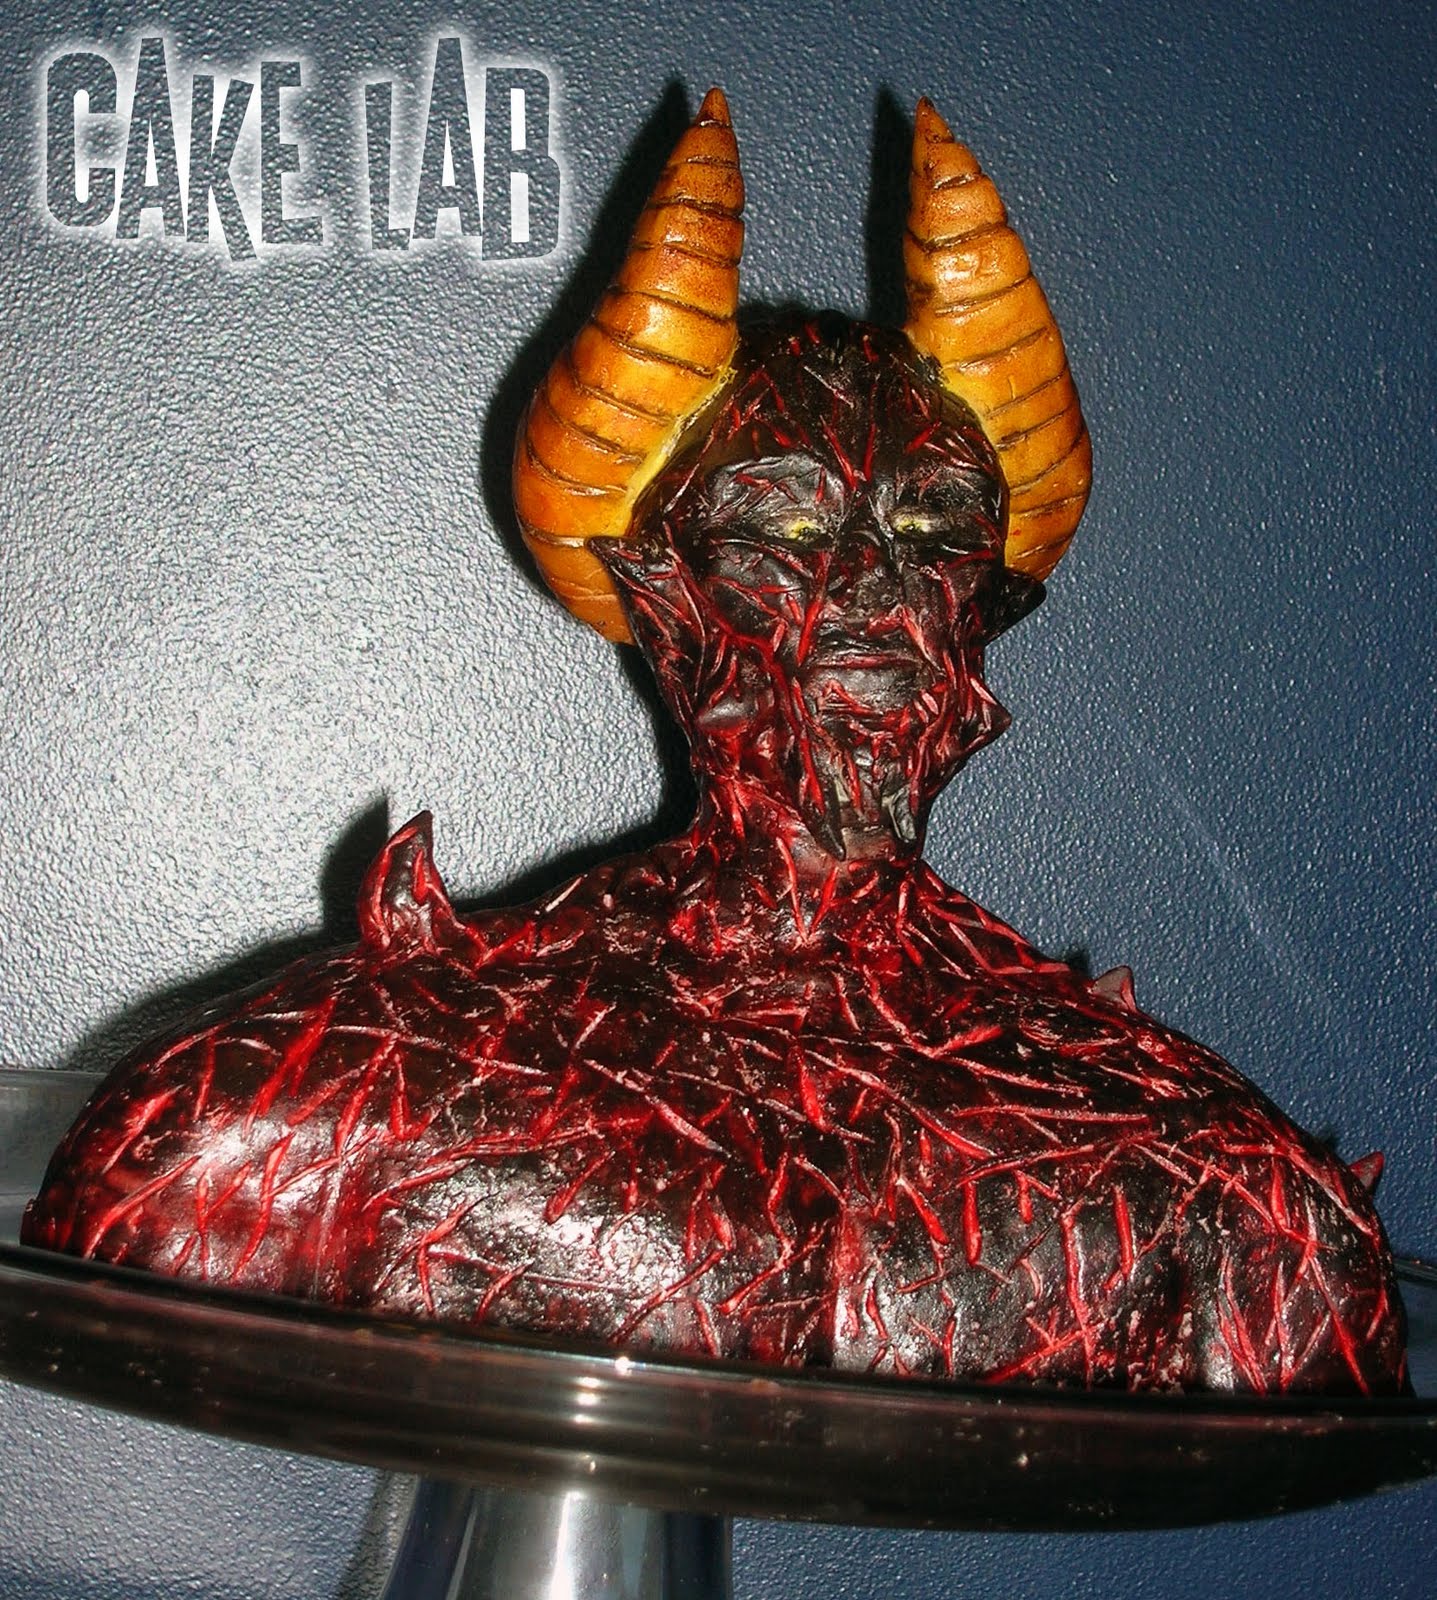
The Beast ( from 'Angel') Cake

This cake was a nice little blast to the past.
One of my dorkiest phases was back when I was a huge Buffy/Angel fan (the shows still rock, but after being off the air for 6-7 years I'm a little less enthusiastic). Not only did I love the shows, but I was somewhat obsessed with collecting related merchandise. The area I spent most of my attention towards was the action figure line. Part of that included being involved in an online community of collectors. Soon some of us began customizing them with different paint jobs, or sculpting episode specific clothes or hair. "Customs" began to get really popular online and I jumped in and even sold a few of mine. The first figure I sculpted pretty much in its entirety was a character from Angel called The Beast (pictured below), and I must've been around 15-16 at the time.

After brainstorming about new cake challenges to tackle, I thought why not go back to my roots and have another go, this time in food form. After some planning I realized there was no way I could do this cake the way I wanted with fondant and gum paste. The detail wouldn't be fine and there would be seams everywhere.
I wondered if I should try modeling chocolate. I had seen many cake decorators use it on TV before but I didn't know much about it. After a little bit of research it turns out you can easily make it by melting some chocolate and adding corn syrup. Awesome!
Before I started I figured the face would be the most challenging aspect as I haven't done much sculpting, and what I have done has been small cartoony animal figures. The head actually went really smoothly (head and horns made of rice krispie treats covered in modeling chocolate), and the body seemed to go pretty well too, but as I was getting ready to paint I noticed things were going downhill fast!
The cake I used was very soft and began sinking under the modeling chocolate. Instead of having the shape I carved it began to look flat. The stick anchoring the head began to poke through the top of the head. My cool cake was turning into a disaster! I decided to bake another cake, this time I wanted to get rid of some old ingredients so used a book recipe that included them. Big mistake. That cake was worse than the orignal. I didn't know what to do...so much work and it was just a mess. Then I though about cutting some of the cake out of the body and replacing it with rice krispie treats, that way the shoulders and neck would have some support. Thankfully it worked and gave me a decently shaped end product. The body isn't exactly as I'd pictured but it was the best I was gonna get without starting all over again.


Painting wasn't too difficult, just painted the thing red then black, and the red stayed in the lines I carved. Horns didn't turn out quite as I'd like...I first airbrushed them yellow then brown which looked awesome, but I then began to paint in the black likes but it wasn't turning out the way I wanted. I whiped off the black with a wet paper towel so that the black would just be in the indent, but it also ruined the airbrushing job. I went over with the airbrush again but since the canvas was a little blotchy I didn't get quite the result I was looking for. Probably the biggest disappointment in the cake is that it's really hard to see the detail in the face since it is black. If I can find the time I may make another demon cake but this time choose one with a lighter skin tone.


So that is it for this cake! Another challenge completed and another addition for my portfoilo. Perfect time of year for this cake too.

Saturday, October 9, 2010

Taking the Leap: Introducing Cake Lab

Sooo, looks like I'm staying in Maine longer than I planned.
I first decided to follow my path to becoming a cake decorator back in February. At the time I still had a few more months of schooling left in Montreal until I earned my degree. Before I left I had lined up a position at a bakery that would be moving outside the city in July and would need new people. My plan was to spend a couple months in Maine before returning to Montreal for work. Well, what I thought was the perfect opportunity wasn't as awesome as I had originally thought. At the end of July I began looking for options in the Boston area as it is just two hours away from my home in Maine. Easy enough to get to but I'd still have my space. I had interviews at two bakeries, and even worked a few days at one of them, but I realized it would require an investment on my part to work out there...what with the pricey rent, car payments, food and health insurance...I just wasn't sure it was worth the investment.
That led me to thinking...why don't I open up my own place? It was always my plan to do it eventually. I just thought it wouldn't be until I was around 30. I figured now was the time for me to learn from someone else. I didn't want all the responsibility that comes with owning your own business. I also didn't think I had the "stuff" to be a success at my current level, but my confidence did get a little boost when I was researching other cake companies. While there are a lot of really impressive decorators out there, there are also a lot that really...aren't. If they can be a success, why can't I? I've definitely had lots of hesitation, but opening any business is a lot or work. Make it one that relies on your creativity and it can certainly be nerve wracking, but I do believe I have what it takes to do this right. The time for risk is now. I'm young and have no responsibilities to anyone but myself. I'm lucky enough to have parents that will allow me to run the business from home for reasonable rent. This is an option that may not always be around.

This may not be the exact route I envisioned myself on months ago, and there sure are some disadvantages...but it's up to me to make the best of them, and in then end this could be the best thing that ever happened to me.

All that leads to the opening of Cake Lab. A fitting name for someone with a science background. I also feel like I'm constantly experimenting new recipes and decorating techniques. It's kinda like a lab! I guess I will never be able to fully escape my science days...

My website is under construction but good enough to present to people. Zcakelab.com - get it? (thanks to one of my mom's friends for the play on words)
Also just started a page on Facebook!

Thanks to everyone who has supported me and been sending positive vibes my way, you have no idea how much I appreciate it.

Thursday, October 7, 2010

Jack O Lantern Cake

October!
Unfortunately that means I'm borderline depressed due to the fact that the time for shorts and soaking in the sun by the pool is over, but at least there is one good thing about the change in seasons...Halloween! It's one of my favorite holidays and the perfect excuse for making some creepy cakes.
I've wanted to make a Jack O Lantern cake for so long but haven't had a reason or the tools to make a really good one. Now that I have my airbrush I can do the cake justice.


The carving of this cake was pretty simple, especially compared to my recent Batmobile cake. I mean, who really cares if it's not perfect because every pumpkin is different. I knew it would be a good idea to use two layers of fondant on this cake to give it some realistic dimension. The other options would be to either paint on the face of cut out black pieces and stick them on, but it definitely wouldn't give the same result.
I've been using pre-made Satin Ice fondant for most of the summer, and had attempted to make my own black marshmallow fondant in the past with poor results. Large quantities of dye are required to get a black color, which really messes up the consistency of the fondant and it never really looks black anyway. BUT I found a recipe online that includes chocolate chips and cocoa powder in the fondant, and it gave me a pretty good color. Not only did I like the texture and color, but it also tasted kinda like a Tootsie Roll!
After covering the cake in black fondant I put on a layer of yellow. The yellow fondant was then airbrushed with orange, brown and copper colors. I went a little bit heavy on some of the copper areas but I'm really enjoying using the airbrush and this cake provided good practice. Once painted, I cut out the features and that was pretty much all there was to it!

Saturday, September 25, 2010

Glee S2 Premiere Cake

I normally don't take half a week to blog about a new cake but I've been really busy recently. For the past few days I've been working at Truly Jorg's Patisserie in Saugus, MA (a Food Network Challenge competitor!). They had a busy week and needed some extra help so I figured why not earn some cash and learn a few things. It was a two hour drive each way but I really enjoyed myself and am grateful for the experience. Now I have some time to get back to my cakes (I have one half finished that I haven't touched since Tuesday! Don't think I'll be eating that one)
My first blog entry was actually for a Glee cake. It was a pretty simple cake and I've learned a lot in the months that have passed so I figured the second season premiere was a good chance to see what else I could come up with.
There were a lot of firsts for me with this cake, and while not everything turned out quite as well as I hoped, I'm not terribly upset and did learn a few things. The hand was made out of rice krispie treats, my first time using that medium. I brushed them with a bit of melted chocolate to firm them up and then layered with buttercream before covering in fondant. With all those layers it ended up a little bulkier than I imagined, something to keep in mind next time I'm shaping the treats. This was also my first time using hexagonal pans. A little more challenging than the standard round pans because all the corners that need to be sharp, but this was good practice. This is also the first time I was able to use my new airbrush. It worked pretty well on the red and blue blocks, but I didn't do it quite right on the smaller ones...takes a little getting used to. Definitley a useful tool that will add more dimension to my future cakes. I'm pretty happy with the way the cast sillouettes, stars, and slushies turned out, but I need to cut the fondant differently next time I'm going for the "pop out of the cake" look.
So yes, I do see a lot of flaws with this cake, but I was able to step it up from my last Glee cake and learn a lot, so I still love it! Plus the new banana cake recipe tasted awesome.

Thursday, September 16, 2010

Batmobile Cake

Monday night I decided to try a new recipe for a peanut butter cake. There were so many possible cake ideas in my head, but I felt a lot of them would turn out better if I had an airbrush (getting my first in 5 days!!!).
As I was browsing cake photos I saw a thumbnail that made me go "is that the batmobile?". Alas, it was not, but I thought "what a great idea!". Not only do I get to make a superhero cake, but I also get to try making a car for the first time.
This cake is based off the 1989 movie, and thanks to flickr member FLG8R for supplying me with reference pics. There's a lot of details from every angle so the photos were very helpful.
Since there is such a transformation during the process of making a sculpted cake, I decided it would be fun to include some progress photos. Trying my hand at making different types of cakes is a good way for me to be able to estimate how long it will take me to do a cake. Even though the size of this cake wouldn't feed many people, a larger cake really doesn't take much longer because you still have to do just as many details. If anything it might be easier to make a larger version because the pieces aren't so damn tiny.
Overall I'm really happy with this experience. Wish I had done a few things differently but there's always next time! Soon it will be time to prep a couple cakes so they will be ready for finishing touches when I get my airbrush. Can't wait!


Monday, September 13, 2010

Converse Sneaker Cake

I decided it was time to up the difficultly level on my cakes. The Celtic one went surprisingly smoothly, given the fact that I had little practice this summer. Maybe it has been the crazy amounts of cake TV I've been watching (favorites are Amazing Wedding Cakes, Food Network Challenge and Ace of Cakes...and the 4 episode Fabulous Cakes was pretty cool too)...but maybe I just kinda absorbed some good technique...haha who knows.
Anyway, shoes are a popular cake choice, so I chose a green Converse sneaker for my first 3D sculpted cake. It did take me a few tries to get the look I was going for. Actually after my first carving attempt I realized I had cut off too much cake, and I had already thrown away the scraps (to save myself from eating them!). Fortunately my partially consumed Celtic cake was sitting just a few feet away, so I cut off a couple slices and molded it onto the shoe form.


It was a ton of fun watching the lump of cake slowly begin to look like an actual sneaker. I must admit it's going to be a little sad digging into this one, or just throwing it in the trash if no one eats it, but it was a great experience and I can't wait for the next 3D cake. Already have a ton of ideas, the hardest part is choosing which one to do!

Saturday, September 11, 2010

Celtic Design Cake

The cakes are back! I took some time off from making cakes for a couple of reasons. First of all, the house has had people coming and going but there has been no event that might require a cake, and I don't always feel like making a cake for no apparent reason when my family won't be around for long periods of time. Another big reason is that I like to be very careful about what I eat, and I am usually very disciplined...but there is no way I can say no to a delicious dessert sitting on the counter!
Finally this week I caved. I was home alone and cleaning out the cupboards and found a cake mix that was about to expire. I have never actually used a cake mix for one of my cakes before, but I figured this either has to be used now or end up in the trash, so why not take advantage of it? I actually made the Celtic triquetra symbol out of gumpaste about a month ago. It was originally going to be used for my attempt to make a book cake. Unfortunately the book had to be fairly large to give the effect I was looking for, so I opted to use a "fake cake" instead. I found that a large cereal box was just the size I needed. I ended up icing the box but the corners were so sharp, decorating it would really not have been anything like decorating a real cake, so I didn't really see any point in continuing.


I decided to make use of what I had and ended up with this. The cake was actually covered in two layers of fondant, and pieces were then cut out of the top. I had seen this technique on tv a couple times, and it really added another dimesion to cake.
I was a bit nervous about the surrounding design. It was all done free handed which meant it was easy to make a mistake. The silver design is just something I came up with, but I think it looks Celtic enough!
Yes, this is a pretty dark cake, but it's exactly the type of cake I love! A true ZacO creation! My next cake will be much "happier" lol.